What changes when you expand your WiiM Bar?
Two WiiM Sound speakers add a left and a right rear channel to your WiiM Bar. Without a separate subwoofer, you have a 5.0.2 setup. Add a WiiM Sub Pro as well and it becomes 5.1.2. For the floor-standing arrangement described here, use two existing Vebos WiiM Sound stands: one for each speaker.
| Equipment | Configuration |
|---|---|
| WiiM Bar alone | 3.0.2 |
| WiiM Bar + two WiiM Sound speakers | 5.0.2 |
| WiiM Bar + two WiiM Sound speakers + WiiM Sub Pro | 5.1.2 |
The rear channels and the .1 channel are therefore two different upgrades. You do not need to add separate front or centre speakers to this shopping list. First decide whether you want just the rear channels or a separate subwoofer too. Then you can plan the layout and cabling.
What do you need, and what is not in the box?
Before you start, check that you have the parts for your chosen setup:
- A WiiM Bar and two WiiM Sound speakers.
- Two model-specific Vebos WiiM Sound stands.
- A suitable TV connection, the necessary cables and power at the devices.
- A network and a phone or tablet with the WiiM Home app.
- For 5.1.2 only: a separate WiiM Sub Pro.
A pair of stands is not a complete surround package. The verified Vebos set contains two stands, installation instructions and mounting hardware. Speakers, Bar, subwoofer and connection cables are not included in that stand set.
The arithmetic is simple: one single stand supports one of the two speakers. If you have no stands yet, you need two for this example. A pair is therefore the natural starting point; count any suitable stands you already own before ordering.
Choose two existing WiiM Sound stands
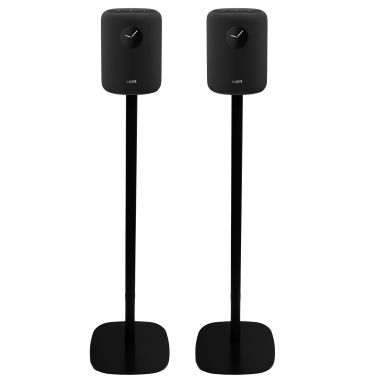
The Vebos stand for WiiM Sound already exists and is designed for that specific model. This black version has a fixed height of 80 cm, measured from the floor to the bottom of the speaker. That is not the overall height with the speaker fitted, and the tube does not extend.
Each base measures 24 × 24 cm. Before ordering, mark out two of these footprints beside or behind the listening seat. Then walk past the sofa as you normally would. Check the space above the base too: a square fitting on the floor does not necessarily mean the speaker will be clear of furniture. This is a practical measuring tip, not an additional WiiM installation requirement.
Secure the speaker using the screw mounting, following the supplied instructions. Use the cable routing, but leave sufficient room around cable exits and connections. Plan the route from each base to the power socket as well. A tidy setup should not leave cables under tension or across a walkway.
Assess placement from your listening seat
Take a sofa facing the TV as the example. The WiiM Bar sits at the front by the television, with one WiiM Sound on its own stand to either side of the rear listening area. Judge left and right from your seat while looking towards the TV, not from the television looking towards the sofa.
Sit down and check whether furniture encloses the speakers and whether both cable routes remain usable. Keep the front and top of the Bar clear too. Do not push it underneath a shelf so far that the upward-facing drivers are covered.
A taller stand is not automatically better. Consider the speaker, sofa and room together. There is no fixed universal angle or distance promised here for every living room, and the stands do not guarantee an Atmos result in every space.
Set up the rear channels in WiiM Home
Physical placement is only half the job. Assign the two devices as surround speakers as well; an ordinary multiroom group is not the same thing.
- Set up the Bar and both WiiM Sound speakers through WiiM Home and connect them to the same network. For 5.1.2, also add the Sub Pro to the Bar following its instructions.
- Connect the TV through the port labelled HDMI ARC/eARC. If the TV lacks that port, WiiM lists optical as an alternative. Select the Bar input that matches your connection.
- Open Devices in the app, go to the WiiM Bar's device settings and choose Home Theater > Surrounds.
- Select the speakers for Surround Left (SL) and Surround Right (SR). Use the sound icon beside each device to hear which speaker you are selecting.
- Continue with Next. After Setup Complete, continue again and use Start to run the connection test.
The English menu names help you find the settings in the manufacturer's guide; their display may depend on the app language. Check the test result before putting the cables away in their final positions.
Test left and right, then troubleshoot dropouts
Listen from the sofa. The speaker you select as left in the app must also be physically on your left. If the test sound comes from the right, check the channel assignment rather than leaving the arrangement as it is based on guesswork.
If there is no sound, first check the selected Bar input and the assigned devices. For dropouts, check the network connection where the devices are placed and run the connection test again. Assess picture and sound synchronisation afterwards, not as a substitute for a stable connection.
If the problem continues, use WiiM's help for stable surround playback. Additional equipment or taller stands are not a default solution for network dropouts. Change one thing at a time so you can identify which adjustment actually helps.
Sound Lite: system support is not proof of mounting compatibility
WiiM also lists Sound Lite as a supported surround device. That does not prove that Sound Lite mechanically fits the Vebos stand for WiiM Sound. The stand recommendation in this article applies to WiiM Sound.
For Sound Lite, first have the three mounting points checked: their positions, screw threads and usable depth. Cable clearance and access to connections must also be correct. This requires a physical check or a reliable dimensioned drawing; similar outer dimensions or weight alone are not enough.
The conclusion is not that Lite definitely does not fit, but that the fit has not been confirmed. Do not buy or improvise an adapter based only on width or load capacity.
Frequently asked questions
How many WiiM Sound speakers do I need for surround?
Two: one for the left rear channel and one for the right rear channel. In the floor-standing arrangement described here, each speaker has its own matching stand, so you need two stands as well.
Can I start without a separate subwoofer?
Yes. WiiM Bar with two WiiM Sound rear speakers forms a 5.0.2 setup. A separate subwoofer is not required to add these two rear channels.
What do I need to add for 5.1.2?
Add a separate WiiM Sub Pro to the same Bar and two WiiM Sound speakers. Adding only two surround speakers makes the setup 5.0.2, not 5.1.2.
Does a Vebos pair include the speakers?
No. The verified pair contains two stands, installation instructions and mounting hardware. The speakers, WiiM Bar, Sub Pro and connection cables are not part of this stand set.
Are the WiiM Sound stands height-adjustable?
No. This version has a fixed height of 80 cm to the bottom of the speaker. Check the height with the speaker fitted and the space around your furniture before choosing.
Does WiiM Sound Lite fit the same stand?
That has not been confirmed. Support as a surround device does not prove mechanical compatibility. First have the three mounting points, screw threads, depth, cable clearance and unobstructed connections checked.
Where do I assign left and right?
In the Bar's device settings, go to Home Theater > Surrounds. Assign SL and SR, then use the sound icon to check that the sound comes from the correct speaker as judged from your seat.
What should I check if the surround speakers keep cutting out?
Check the network at the devices and run the connection test again. Then assess picture and sound synchronisation and consult WiiM help if needed. A different stand will not fix a network problem.
Finish with the right two stands
First choose 5.0.2 without a separate subwoofer or 5.1.2 with Sub Pro. Then check both footprints, the fixed height and cable routes. If they suit your sofa and walking space, you can choose the existing WiiM Sound stands and set up the two rear channels.
Use the pair as your starting point for two speakers. The single version is relevant only if you already have one matching stand or want to assemble your quantities separately.